Panasonic 65VT60 Calibration Guide Using Lightspace And eeColor LUT Box
This is a 3D LUT display calibration guide and workflow for the Pansonic TC-P65VT60 Plasma display to achieve the best possible color and gamma performance.
This guide covers a workflow using , using a 65^3 LUT and dedicated calibration & profiling workflow tools from DisplayCalibrationTools.com.
We will be using custom profiling & validation patch sets (that are superior to standard grid sequence sets) and perform gamma adjustments that ultimately deliver stunning image quality.
Equipment, software and target used in the calibrations listed below:
- Colorimeter: Klein K10-A
- Spectro: i1Pro
- Lightspace 6.6.0
- Pattern generator: Lumagen with 11.11% (medium) windows
- Calibration target: Rec 709 Gamma 2.2
- LUT holder: with 65^3 LUT
- workflow tools: Custom Color Patch Sequence Generator, Lightspace Profile Reporter, Lightspace Custom Color Space Creator
Workflow Overview
- Pre-Profile Display & Equipment Setup
- Picture Mode
- Picture Enhancements
- Color Gamut
- Optional Gamut Adjustment
- Brightness
- Contrast Setting & Clipping
- Gamma
- eeColor Setup
- Lumagen Pattern Generator Setup
- Meter Placement
- Profiling Patch Set
- Profiling & LUT Creation
- Gamma Validation
- Lightspace Active LUT vs. eeColor Active LUT
- Gamma Improvement
- Custom Color Space Gamma Validation & Further Adjustments
- eeColor LUT Preparation & Upload
- Validation Patch Set
- Color Validation - 1087 Point Patch Set
- Color Validation - SG Flesh Tones
- Color Validation - Delta E 2000 Filter 2.3
Pre-Profile Display & Equipment Setup
Picture Mode
We will use picture mode Professional / ISF Night for this calibration.
Picture Enhancements
First thing to do is to turn off all internal processing features:
- Vivid Color: Off
- CATS: Off
- Video NR: Off
- Mpeg remaster: Off
- Resolution remaster: Off
- Caption smoother: Off
- Brilliance enhancer: Off
- Motion smoother: Off
Now we set up the general display settings:
- Color gamut: Native
- Gamma: 2.4
- Panel brightness: Mid
- Color Temp: Normal
- Tint: 0
- Sharpness: 0
- AGC: 0
- Black extension: 0
- Black level: light
Color Gamut
We chose a color gamut of Native which is more saturated than the Rec 709 target but this gives the 3D LUT some "room to work with" when it adjusts the primary colors. The same goes for the gamma preset of 2.4, which is darker than the 2.2 gamma target.
Optional Gamut Adjustment
We currently have the gamut set to Native which positions the primary colors R|G|B quite a bit away from their Rec 709 target.
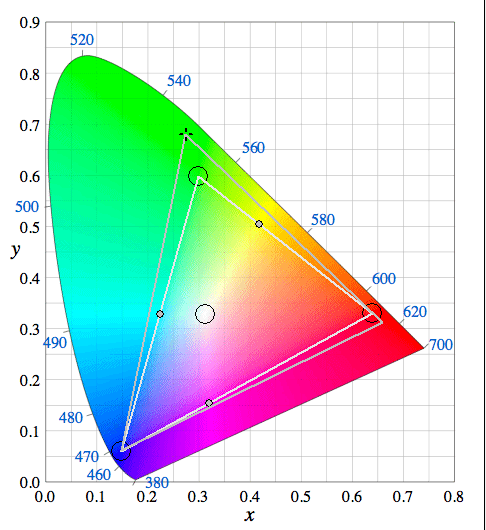
The 3D LUT will adjust these points to be on target, but just to mention another calibration approach:
We could use the CMS controls of the VT60 to bring the Red and Green primaries closer to target (not absolutely on target - we would still leave them outside of their target), the Blue primary is already very close (saturation wise). In doing that we would still give the Lightspace color engine enough "room to work with" and we could potentially reduce the amount of signal processing / signal adjustment that the final calibration LUT triggers inside the .
This can help to reduce the chance of banding or artificial artifacts that the LUT can introduce when the signal adjustments are very high.
The eeColor 3D LUT Analyzer tool was built for this purpose to compare various eeColor LUTs and to determine which one triggers the least amount of processing. There's more info about this topic in the eeColor LUT Preparation & Upload sub-section below.
For this calibration we leave the gamut at the default Native settings, we will cover a comparison of different pre-profile gamut & greyscale setups in a future calibration guide.
Brightness
We now set brightness using a dedicated calibration image either displayed via Blu-ray or a media player.
Contrast Setting & Clipping
With the contrast setting you will see that once you go beyond a certain contrast setting on VT60, although you're not even close to the maximum setting, the luminance output will not increase anymore. We set the contrast to the last setting that still increased luminance output.
Before we move on, we make sure by checking dedicated calibration images (displayed via Blu-ray, media player or the pattern generator) that our current contrast setting does not introduce clipping.
White Point & Greyscale RGB Balance
When it comes to greyscale in pre-profile display setup, the minimum that you should set is the white point (if your display has CMS White Balance controls). For this calibration we set 30/100 (30% stimuli and 100% stimuli) greyscale points as accurately as possible using the internal CMS controls of the VT60. We could optionally set 10-100 accurately via the VT60's 10-point White Balance CMS controls.
Gamma
The VT60 has inconsistent Gamma, and can show wild gamma spikes, especially in the 85-100% brightness region. Here's an image of the screen's gamma response with all internal gamma controls at default from a 101 point Greyscale profile validated in the Lightspace Profile Reporter:
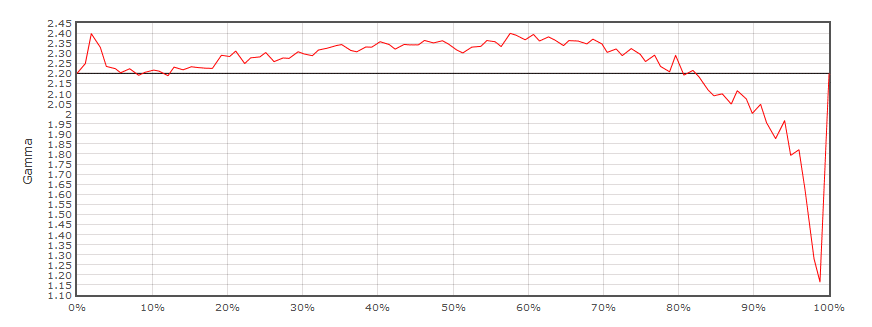
As you can see, the display has a very large gamma spike that goes down to 1.15 in the 95%-100% stimuli range.
One thing to note is that that although this is a big deviation from the gamma target, the actual luminance output at these points compared to the target luminance output is minimal (not as drastic as it appears on the graph). The way gamma is calculated at stimuli points at the beginning and at the end of the stimuli range make gamma deviations look more drastic on this particular graph type, that is why the Lightspace Profile Reporter always displays 2 different gamma graphs. In our gamma adjustments (that follow later in the workflow), we will adjust that gamma spike but mainly focus on improving the 78%-95% range.
The internal CMS of the VT60 has 10 point gamma controls which are working just fine and we use them to lift some of the problematic points above the target line. The better the pre-profile gamma setup the easier the gamma adjustments will be later on.
eeColor Setup
Make sure to switch to a Unity LUT (default, no compensation LUT) before starting the profile.
Lumagen Pattern Generator Setup
First of all we make sure the Lumagen uses an input with an empty CMS slot with no greyscale or LUT (color gamut) data. To be sure we reset the CMS greyscale and CMS color gamut data of the input that we are using.
Set up the active Lumagen input so that it outputs: 1080p | 23.98 Hz | YCbCr 422.
As a side note YCbCr 422 outputs 12-bits per pixel from the Lumagen, while YCbCr 444 is dithered to 8-bits (and might introduce static noise in darker patches), so YCbCr 422 is the better output option.
Now connect the Lumagen to the host PC via USB. Start Lightspace. Under File > Upload we select the Radiance with Medium size patterns. This results in 11.11% windows. This is a good compromise on a Plasma display to produce large enough patterns to pick up some of the Plasma noise while not too large to have ABL kick in too fast.
Note: On the smaller models of the Panasonic VT60 series, such as the 50" and 55" models, it is highly recommended to use 6% APL windows. These sets suffer from color contamination that can result in "green faces", and it has been proven that smaller APL windows are a good way to profile these sets. The 65" model used in this calibration does not have these issues.
Meter Placement
We place the K10-A 20" off screen. Plasma can produce quite a lot of heat over time in addition to the Plasma noise that can be seen when getting very close to the screen. It is therefore recommended to place the meter off-screen for Plasma profiling or Plasma calibration.
You can use our Meter Distance & Pattern Size Calculator, which is a free tool, to calculate the maximum distance that you can set your specific meter at.
Profiling Patch Set
The profiling patch set that was used in this calibration is a larger color patch sequence that was created via the Custom Color Patch Sequence Generator. Prior to Lightspace supporting the import of custom color patch sequences we've been using 21^3 grid sequences with 9,261 points. With a fast meter (such as the K10-A that we are using here) the time frame is easily doable.
Grid sequence patch sets have been the standard of the calibration industry, but they are not (very) efficient and the profile point distribution on the brightness scale is rather poor. Grid sequences push too many profile points into the higher brightness range ignoring or under-sampling other important parts of the gamut.
This patch set was targeted to have equal or less points than a 21^3 grid sequence but with improved performance, as in that it "scans" / profiles the gamut more evenly and more thorough, providing more relevant and conclusive information to the color engine. This set has 9,137 points (so slightly less than a 21^3) but with better profile point coverage and distribution than a standard grid sequence including a 101 point Greyscale (and all corresponding R, G, B reads for RGB separation evaluation later on).
This color patch sequence set is very straightforward (in it's structure), and you could easily decrease the point count (profile size) if you like. It is important to understand though that the more accurate and conclusive data you provide to the color engine, the better the results will be. We do not recommend making profile sets too small.
Here are the parameters that were used in the Custom Color Patch Sequence Generator | Custom Patch Set section to create the set via HSB controls that are easy to understand and to adjust:
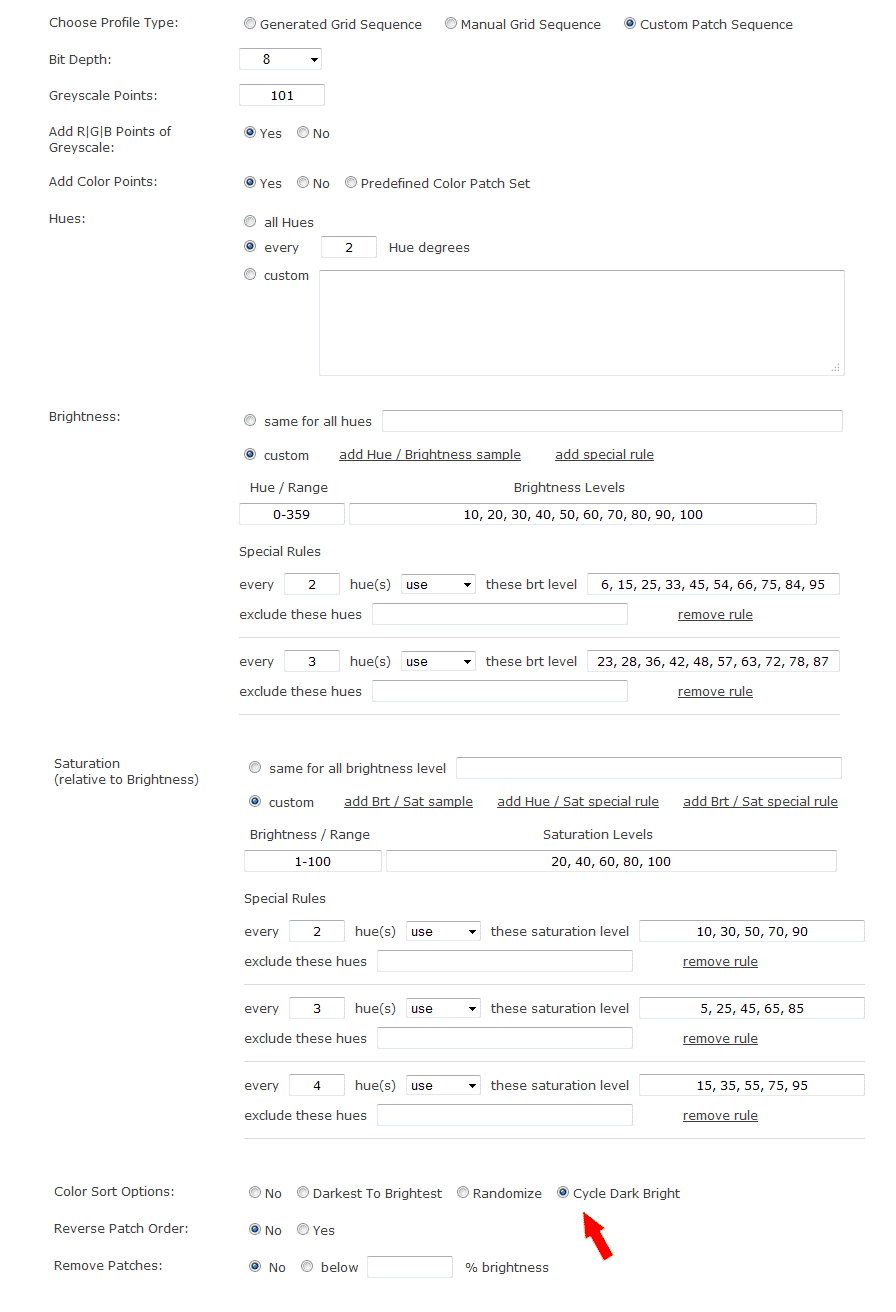
To learn more about how custom patch sets can improve your calibration please read the Advantage Of Custom Color Patch Sets In Display Calibration guide.
Explanation of the parameter settings:
Hues
As you can see - in this specific patch set - we are sampling every 2nd integer hue value, so out of 360 (integer) hues, we are sampling 180 hues. That is a tight spacing of just 2 hue degrees and will make sure we don't leave out too many hues (ergo color regions).
Brightness Level
For brightness levels, we are sampling a total of 30 (!) brightness level, a 21^3 (with more profile points) samples just 21 brightness levels. As you can see the brightness levels are divided into 3 groups of 10 brightness levels and changed for each hue, this keeps the the total point count lower but allows us to sample 30 brightness levels in just 4 hue degrees. Also, note how the 3 brightness level groups are stacked / spaced within each other, they sit within the other groups spacing.
Here's a detailed example of the brightness level sample logic which consists of 3 groups:
- the hue at 0 degree is sampled with these brightness levels: 10, 20, 30, 40, 50, 60, 70, 80, 90, 100
- the hue at 2 degree is sampled with these brightness levels: 6, 15, 25, 33, 45, 54, 66, 75, 84, 95
- the hue at 4 degree is sampled with these brightness levels: 23, 28, 36, 42, 48, 57, 63, 72, 78, 87
- the brightness level cycle then starts again at 6 degree using the brightness levels from group 1 (used in the 0 degree sampling)
This is very powerful, we could easily refine this patch set and even expand the brightness level range without increasing the total profile point count ! So we could add another 10 unique brightness levels for a total of 40 brightness levels over a span of just 6 hue degrees.
It is important to keep in mind to find a balance between the hue span and the brightness levels. Don't let the span get too wide using brightness levels points that are "too far apart".
Saturation Level
Saturation levels are relative to brightness, so each of these saturation levels are sampled for each (or specific) brightness level. Again, because we want to get the most relevant data from the gamut out of our patch set, we divide saturation levels in groups. This set uses 20 well spread saturation levels in 4 groups. Similar to what we do with the brightness levels, we change the saturation levels for the brightness levels with every other hue from our hue set.
Here's a detailed example of the saturation level sample logic which consists of 4 groups:
- brightness levels at 0 degree hue are sampled with these saturation levels: 20, 40, 60, 80, 100
- brightness levels at 2 degree hue are sampled with these saturation levels: 10, 30, 50, 70, 90
- brightness levels at 4 degree hue are sampled with these saturation levels: 5, 25, 45, 65, 85
- brightness levels at 6 degree hue are sampled with these saturation levels: 15, 35, 55, 75, 95
Again, note how the 4 saturation level groups are stacked / spaced within to each other, they sit within the other groups spacing.
Summing up, over a narrow span of just 6 hue degrees we are sampling 3 unique hues, 30 unique unique brightness levels (with a total of 40 brightness levels sampled) and 20 unique saturation levels - all nicely spaced to cover the region evenly.
Color Sort Options
As you can see on the patch set parameters screenshot (marked with a red arrow) we arranged the patches to cycle between dark / bright patches. Since the Panasonic VT60 is a Plasma display, this technique can help prevent or circumvent ABL which is inherent to all Plasma displays.
Here's a visual evaluation of the patch set, done with the Color Patch Sequence Viewer:
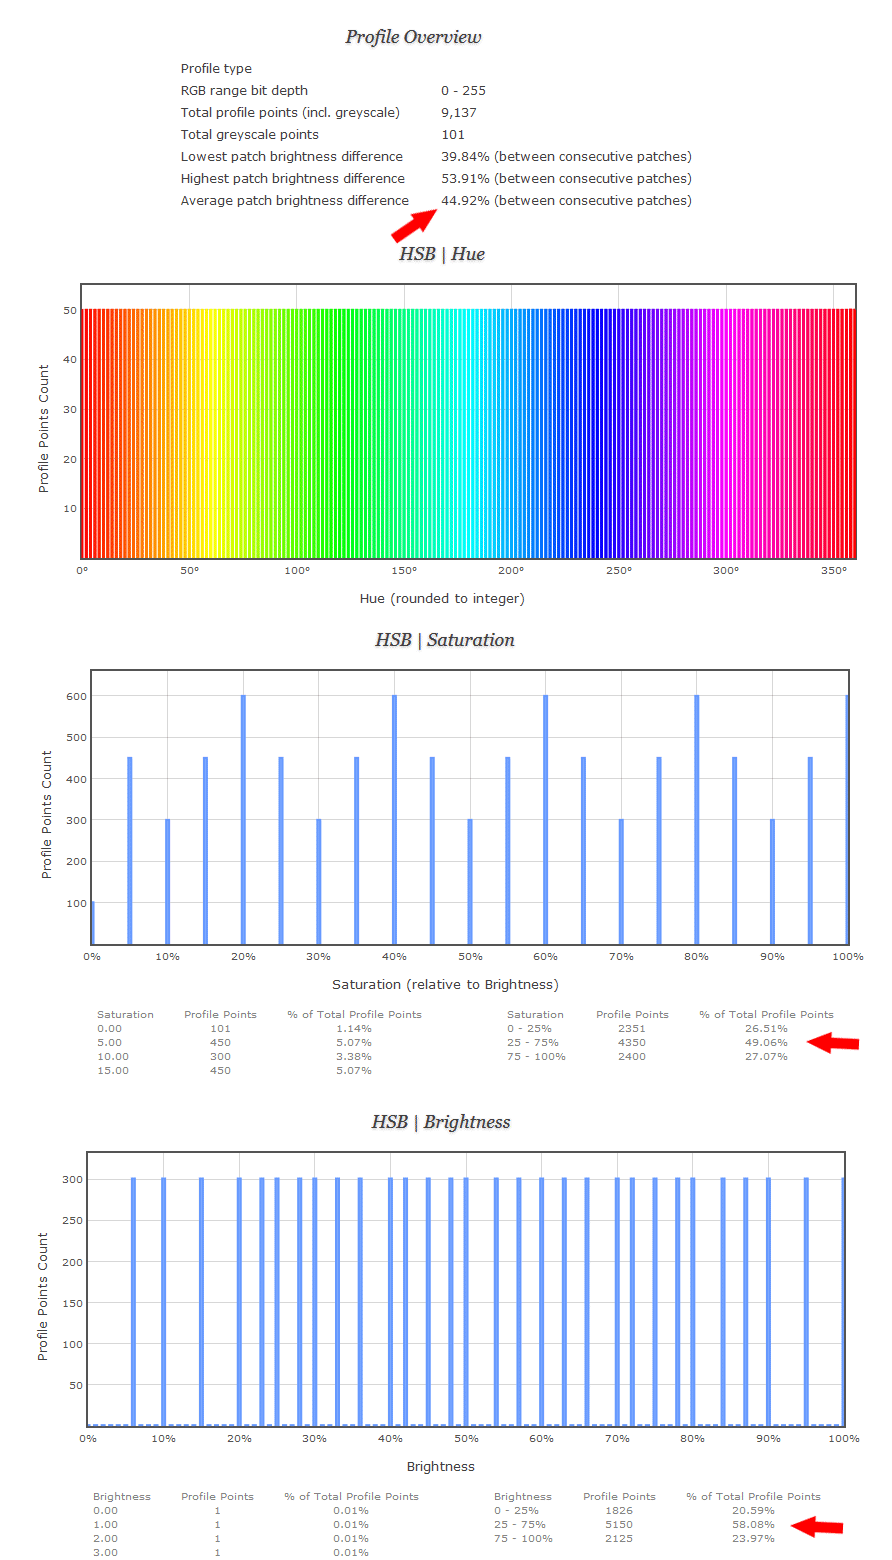
The average patch brightness difference (marked with a red arrow) tells us the average brightness difference between patches - the higher the number the better for Plasma display profiling.
Below the saturation and brightness graphs, marked with a red arrow you can see that the points are distributed evenly, especially pushing enough data into in the 25%-75% range, which is the majority of real world content. Standard grid sequence patch sets do not do that.
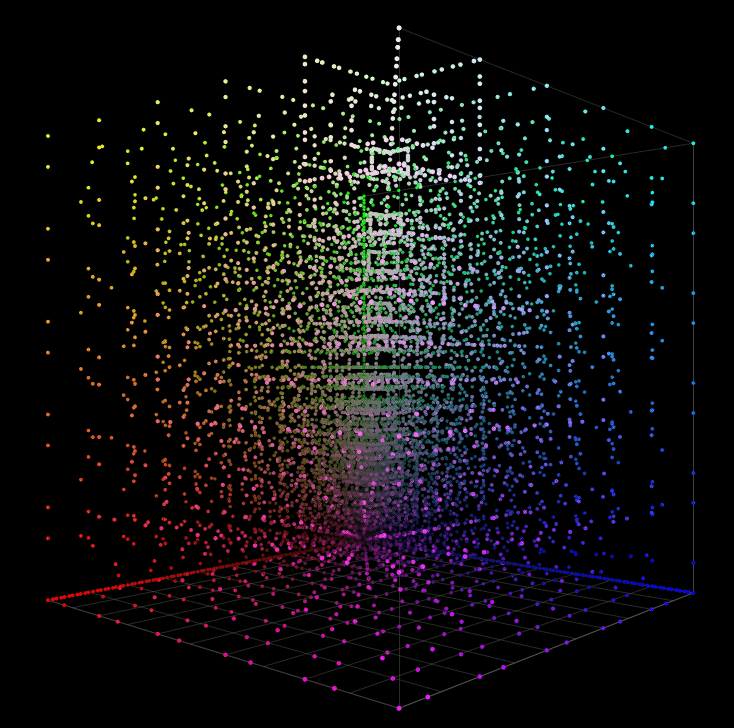
Here's a screenshot of the 3D RGB Color Cube, as you can see the points are evenly distributed between the middle and the edges of the cube which is where the 25-75% range is - the points are not cluttered on the walls and axis of the cube as it is with grid sequences:
Further Refinements & Decreasing Patch Set Size
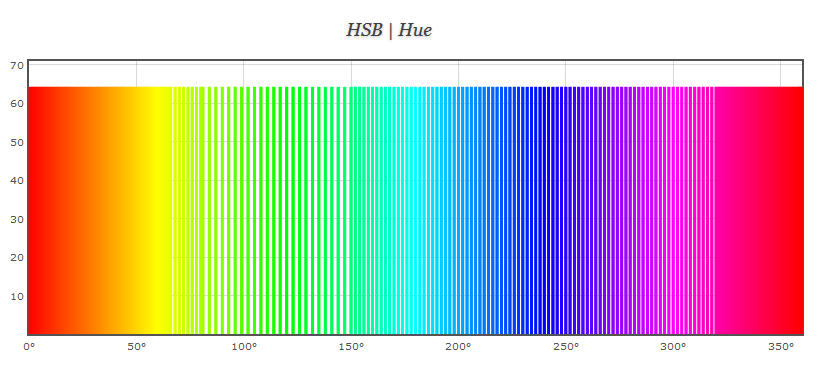
To further refine this set, one could start to adjust the hue spacing depending on region, e.g. sample with wider spacing in dense gamut regions (green, blue) and with more narrow hue spacing in less dense regions (red). Just don't let the spacing get too wide. In addition, one could add more brightness & saturation levels and distribute them smartly.
Here's an example of different hue sampling depending on hue region created with the Custom Color Patch Sequence Generator:
If we want to decrease the patch set size, there are lots of options:
1) We could decrease the brightness levels below 25% brightness and above 80% brightness, because the shadows and highlights contain less information. If our screen is inaccurate in the shadows (i.e. LCD backlight contamination) we don't need to waste time there anyways. Same if our meter cannot read low light levels well.
2) We could also sample less saturation levels in lower brightness levels (e.g. for 25% brightness or lower), because the color differences between darker colors are less.
3) Another approach is to keep all brightness and saturation levels but increase the hue spacing, e.g. sample every 3rd or 4th hue which will reduce the patch set size quite a bit.
4) Or one could simply remove some brightness levels and some saturation levels (which are sampled in all brightness levels). This will drastically reduce the patch set size. Instead of 30 brightness levels one could use 20 or 15, instead of 20 saturation levels one could use 10.
Lots of options.
Profiling & LUT Creation
In Lightspace, we go to the Display Characterization section and then click the CSV tab to import our custom profiling patch set.
We then setup the Probe Options for our K10-A meter, which includes our spectro offset and a 0.75s extra delay. The extra delay is an attempt to prevent temporary IR (Image Retention) from the last color patch, which would contaminate the current patch and therefore distort the probe read result. This is workflow is highly recommended on Plasma screens.
We now start the profiling session of our 9,137 custom patch set, which took ca. 3.5 hours to complete. On a non Plasma screen without the need for the extra delay this would have been around 1h 40 mins.
We then create a Rec 709 Gamma 2.2 LUT in the Convert Color Space section.
Gamma Validation
Before we run a full color validation profile, we first check on Gamma performance of the LUT as Lightspace provides features to improve Gamma which is very easy to do using the Lightspace Custom Color Space Creator.
In order to check the Gamma performance of the LUT, we run a 101 point Greyscale only patch set which you can easily create in the Custom Color Patch Sequence Generator | Custom Patch Set section. The reason we run a 101 point Greyscale profile is because not only is this a sufficient amount of data but this is also the maximum amount of Gamma adjustment points that Lightspace allows and we want to make as many adjustments as we can.
We run this 101 point validation patch set with the Rec 709 Gamma 2.2 LUT active in Lightspace, there's no need to upload the LUT to the yet at this point as we might tweak the LUT (multiple times) and the upload process to the is unfortunately time consuming.
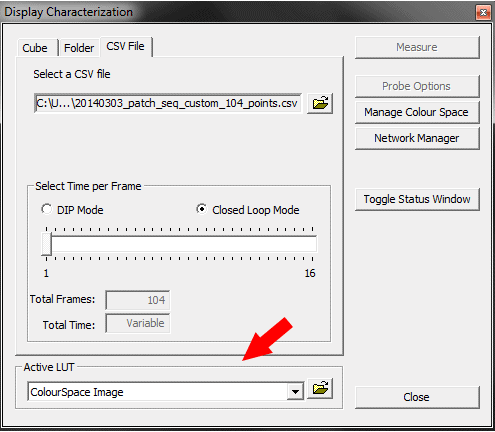
In order to make the Rec 709 Gamma 2.2 LUT active in Lightspace (after you created it and the LUT is open in Lightspace), simply open the Display Characterization section, click the CSV tab, select the 101 point Greyscale only file and then in the Active LUT select menu, choose the LUT that is currently open in Lightspace by selecting the Colourspace Image option.
Here's the gamma graph of the Rec 709 Gamma 2.2 LUT from the original 9K display profile validated with a 101 point Greyscale in the Lightspace Profile Reporter:
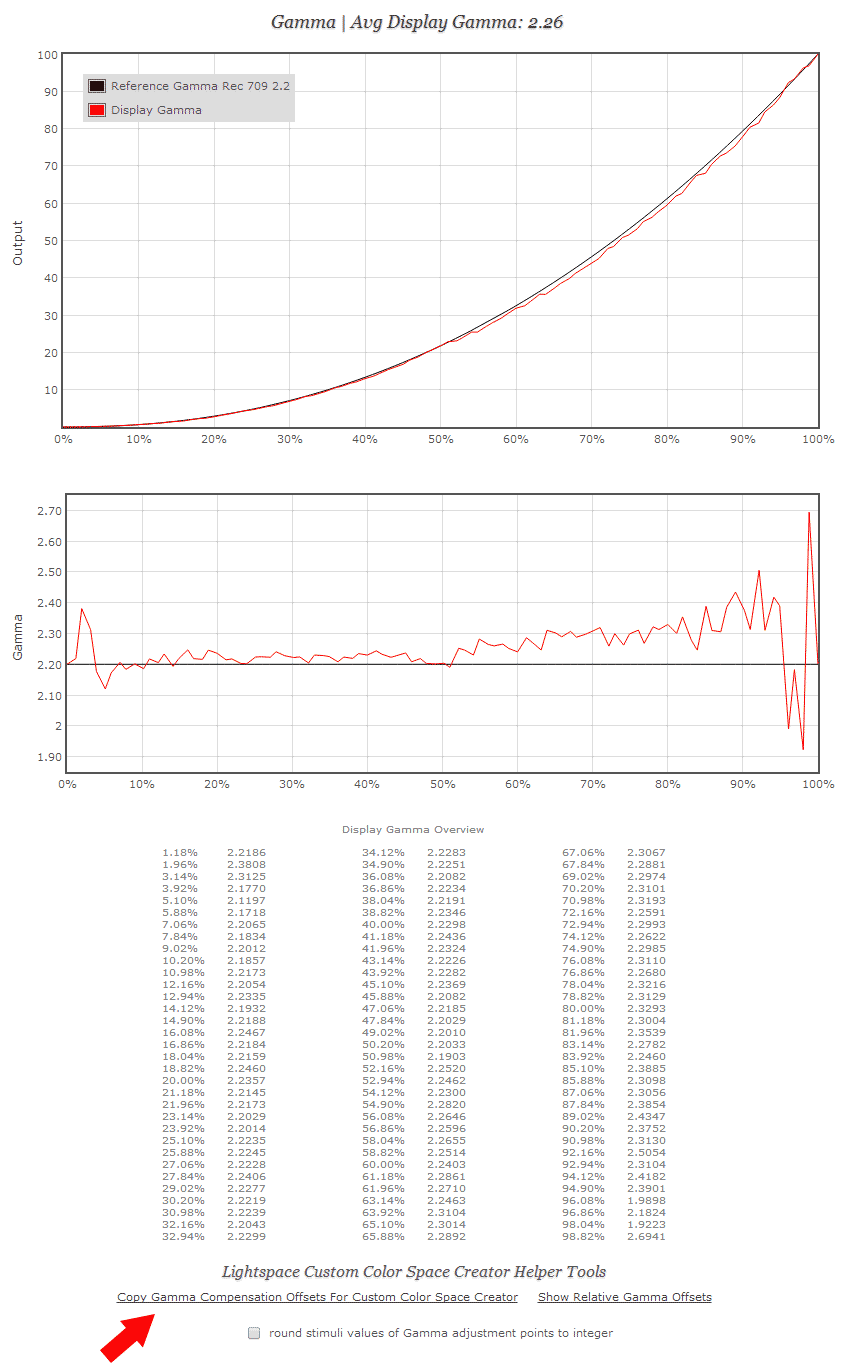
The LUT has an average Gamma of 2.26 and the Gamma log-log graph shows Gamma inconsistencies, we want to improve that.
Lightspace Active LUT vs. eeColor Active LUT
The 101 point Greyscale validation profile that we just ran was done with the LUT active in Lightspace. This is a fast and convenient workflow and the reason we choose this workflow here (in this particular calibration) is because the LUT upload to the is very time consuming.
In a perfect world we would always upload each LUT to the and then run our validation profiles. The last color validation profiles that we will do in this calibration guide (including the 1087 point validation profile) will be done with the LUT active in the .
The advantage of running profiles with the LUT active in the actual LUT holder (in this case the eeColor box) is that the profile will report distortion that the LUT box (possibly) introduces when it is processing the LUT to adjust the signal. Having the LUT active in Lightspace does not report any of the (possible) distortion the LUT box might introduce. In addition, Lightspace internally does not use a 65^3 LUT but the will use a 65^3 LUT so theoretically there might also be a slight difference.
The advantage of running profiles with the LUT active in Lightspace is, besides the faster workflow, that you can see how accurate the adjustments actually are that the Lightspace color engine calculates. If the validation on the LUT uploaded to the LUT box then reports other data, then this might be a sign of distortion the LUT box introduces or in some rare cases a sign of display drift.
Fortunately we can report that the introduces (almost) zero to none distortion and the LUT active in Lightspace delivers (pretty much) the exact same results as the LUT being active in the . That is why (in the case of the eeColor box) we can use the active LUT feature in Lightspace and speed up the process of the gamma validation profiles.
Gamma Improvement
In order to improve the Gamma of the LUT we will use the Lightspace Custom Color Space Creator to create a custom color space with Rec 709 gamut coordinates and specific Gamma adjustment points and then use that custom color space in Lightspace to create a new LUT from it in the Convert Color Space section.
To do this you could now go to the Lightspace Custom Color Space Creator and start manually creating gamma adjustment points by looking at the gamma values below the gamma graph and then calculate offsets, but Display Calibration Tools has a few helpers that pretty much automate the process. In the Lightspace Profile Reporter, simply click the "Copy Gamma Compensation Offsets For Custom Color Space Creator" link marked with a red arrow in the above screenshot (wait until the message "Done !" appears) which creates 99 gamma adjustment points and sends them to the Lightspace Custom Color Space Creator.
The maximum number of gamma adjustment points that Lightspace allows in a custom color space is 101 and without black (0% stimuli) and white (100% stimuli) that do not have gamma, we are left with 99 gamma adjustment points. Again, this is the reason we ran a 101 point Greyscale so we can create and use the maximum number of gamma adjustment points - the more adjustment points, the better.
We now go to the Lightspace Custom Color Space Creator tool and create a new custom color space.
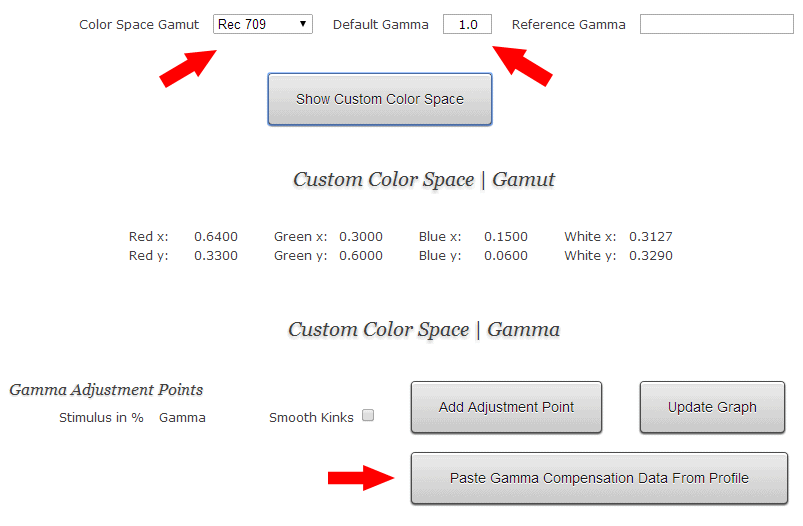
As you can see we have created a new custom color space with Rec 709 gamut (simply select Rec 709 from the preset menu) with a default gamma of 1.0, not 2.2.
Now this can be confusing, but the reason we use 1.0 is that if one uses a lot of adjustment points (and we will be using the maximum of 99) it is better to state a default gamma of 1.0 which allows us to freely shape the gamma response of the custom color space to our liking, and most importantly this results in more accurate adjustments. If you only a have a few gamma adjustment points, then it is better to state a default gamma of 2.2 (if you are targeting a 2.2 gamma) - but again, the more adjustments points you create, the better.
The "Paste Gamma Compensation Data From Profile" button pictured above only appeared because you created gamma adjustment points in the Lightspace Profile Reporter. We click the button and 99 gamma adjustment points are created for us - here's a screenshot of the 99 adjustment points:
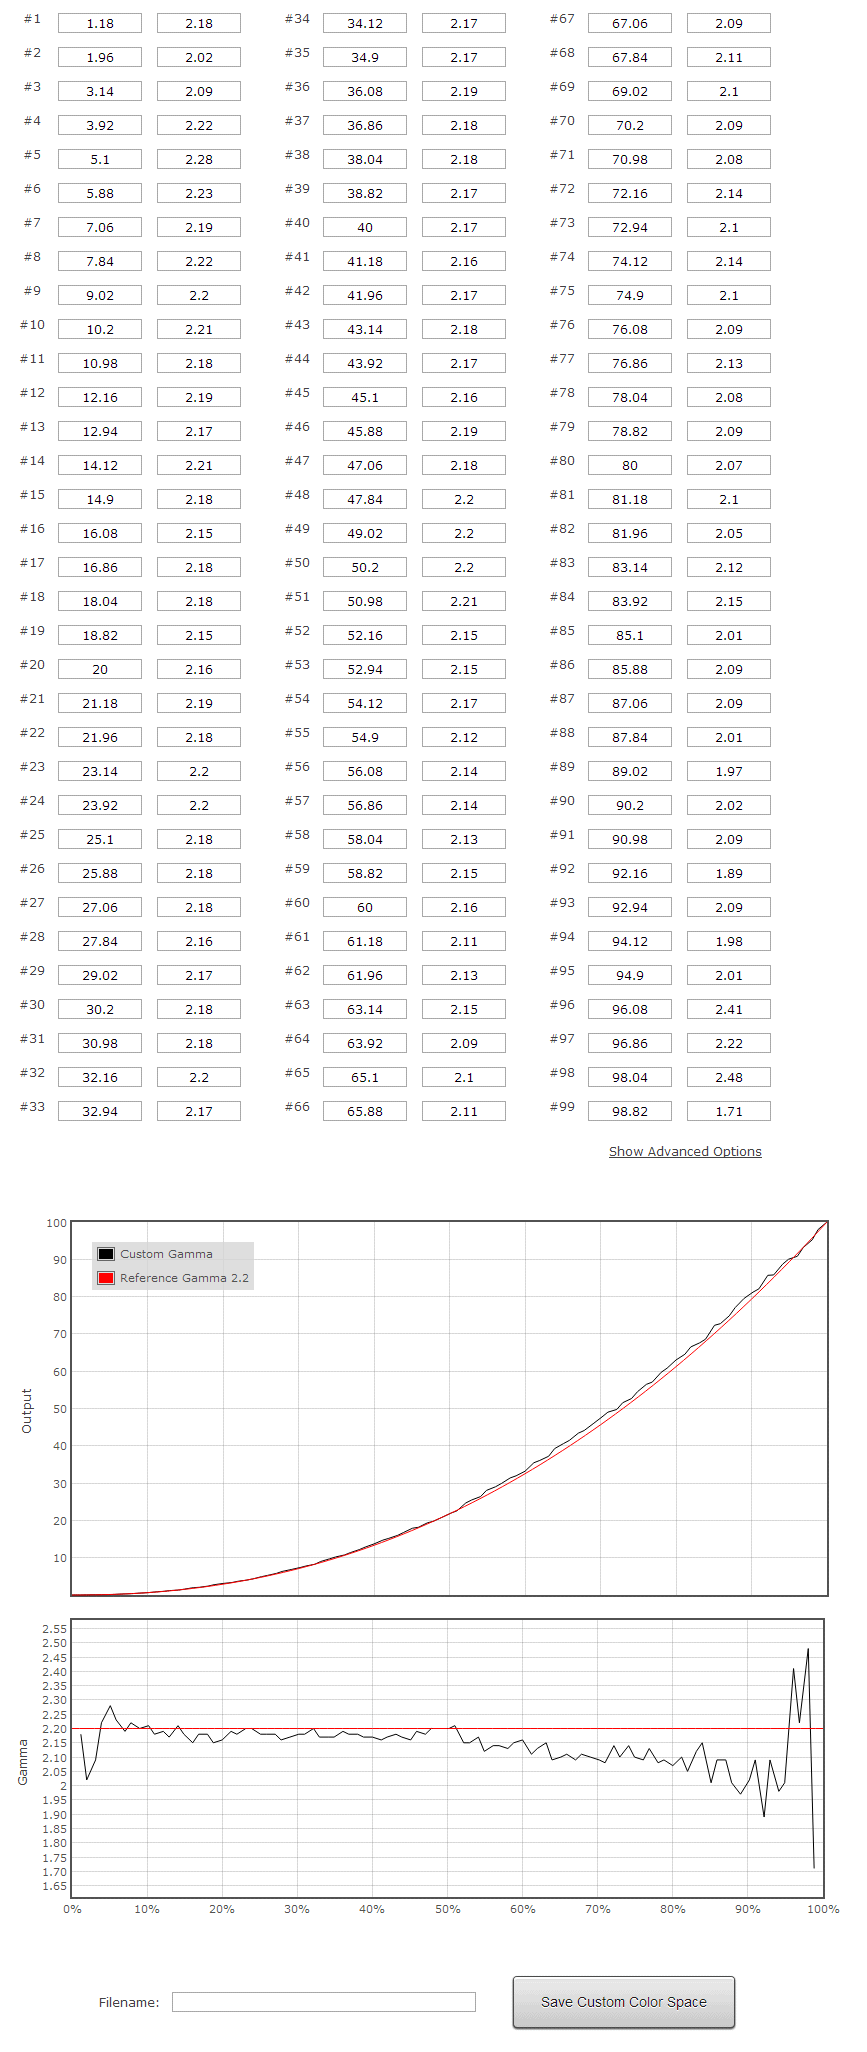
Save the custom color space, e.g. VT60_ccs_1 - we might be doing multiple custom color spaces so name accordingly.
Do not close this window, leave the Custom Color Space Creator section open and leave all adjustment points exactly as they are. These points will be used as a base if we want to further revise the gamma response.
In Lightspace in the Convert Color Space interface, we now create a new LUT from this custom color space.
In the SOURCE Color Space select menu choose the custom color space that you have created. If it is not in the list, then you can make your custom color space available by using the Manage option at the bottom and then choose Import. Once done, you can see that it shows you 101 parametric points which are our 99 adjustment points plus black (0%) & white (100%).
In the DESTINATION color space select menu, choose your original display profile, in our case our profile with 9,137points.
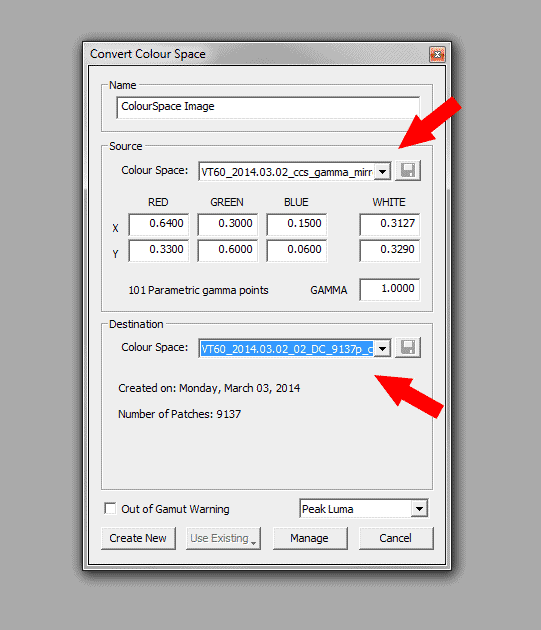
Custom Color Space Gamma Validation & Further Adjustments
The process that starts now can be repeated as many times as you like until you are happy with the gamma, it is usually not necessary to do it more than once or twice as usually the gamma response does not improve further after that.
We run another 101 point Greyscale only profile with the LUT (that was created from the first custom color space) active in Lightspace and then validate the profile with the Lightspace Profile Reporter. In our case the gamma did improve but we wanted to improve even further.
The process to further adjust an existing custom color space is similar to what we've done so far, with a small difference: in the Lightspace Profile Reporter, below the gamma graphs and the gamma overview, now click the link "Show Relative Gamma Offsets".

This will show a textarea that contains relative gamma offsets for each of the stimuli points. We will use the gamma offset data and apply it to our existing custom color space which has the original gamma adjustments. 2 very important things about this process:
(a) It is important to understand that all further gamma revisions / gamma adjustments must be made to the gamma adjustment points of the last custom color space, that is why we said above to not close the custom color space section and to leave all original adjustment points intact.
(b) The stimuli points of the relative gamma offset points must match the stimuli points of the last custom color space in order to apply the new offsets. Since we created the first custom color space from a 101 point Greyscale only profile (with 99 adjustment points) and we now ran another 101 point Greyscale only profile (giving us 99 adjustment points), the stimuli points naturally match.
Now we copy the data in the textarea.
We switch back to the Lightspace Custom Color Space Creator window with our last 99 adjustment points, and below the adjustment points on the right side we click the "Show Advanced Options" link. In the now visible textarea, we paste the relative gamma offset data that we copied from the Lightspace Profile Reporter. Here's a screenshot:
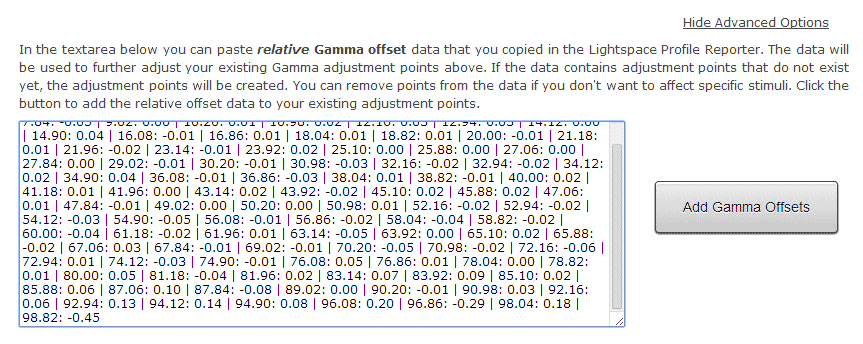
Now we click the Add Gamma Offsets button to add these new offsets to our existing adjustment points.
The steps that follow now are the same as before:
- we save this new custom color space (e.g. VT60_ccs_2)
- we import the custom color space into Lightspace, so we can select it in the Convert Color Space select menu
- we create a new LUT from our VT60_ccs_2 custom color space and our original 9,137 point display profile
- we run another 101 point Greyscale only profile with the new LUT active in Lightspace
- we then validate the Gamma performance via the Lightspace Profile Reporter
- we could optionally use the relative gamma offsets again to further adjust the existing custom color space and repeat this process
On this Panasonic 65VT60 we did just 2 custom color spaces, took altogether ca. 10 mins using the helpers (which speed things up quite a bit). Here's the Gamma that the LUT produced (using the second custom color space):
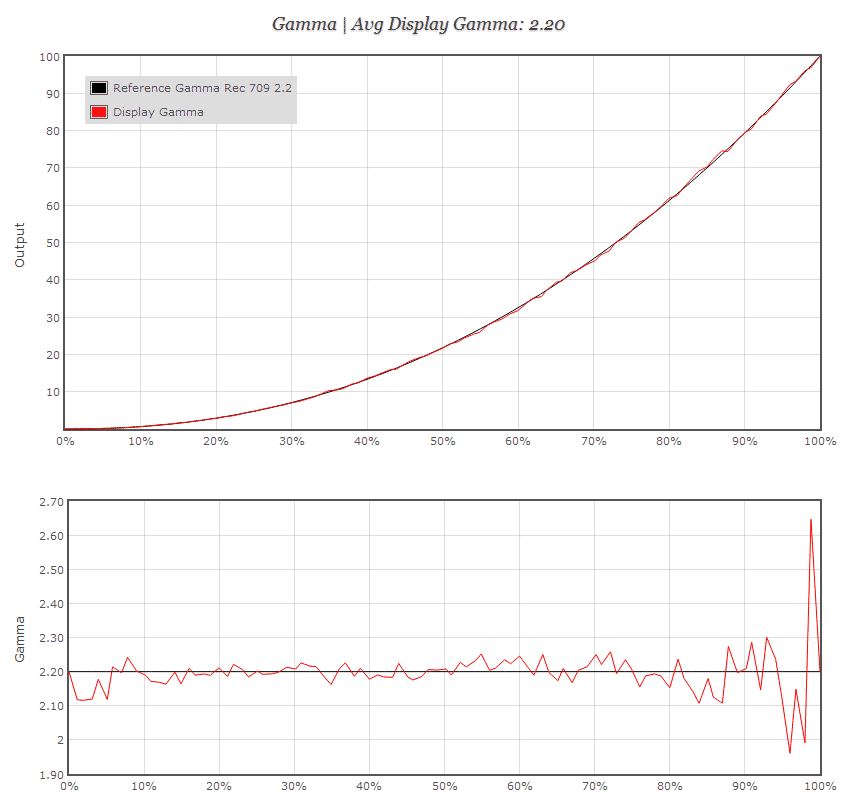
Much better. We could go on with tweaking, but we'll leave this as is for now.
As mentioned in the beginning of the guide, although the gamma spikes at 0%-5% stimuli and 95%-100% stimuli are larger deviations from the gamma target, the actual luminance output at these points compared to the target luminance output is minimal (not as drastic as it appears on the graph). The way gamma is calculated at stimuli points at the beginning and at the end of the stimuli range make gamma deviations look more drastic on this particular graph type, that is why the Lightspace Profile Reporter always displays 2 different gamma graphs.
In the case of this VT60 this concerns the larger gamma spikes at 95%-100% stimuli, but again since the actual luminance difference is minimal at these points, they can be disregarded.
We now move on to color performance validation.
eeColor LUT Preparation & Upload
We now videoscale the LUT and then upload it to the .
With the last LUT (created from our final custom color space) still open in Lightspace, we go to Edit > LUT Manipulation > VideoScale. This will videoscale the LUT. Since the has no internal scaling ability the LUT must be videoscaled in Lightspace.
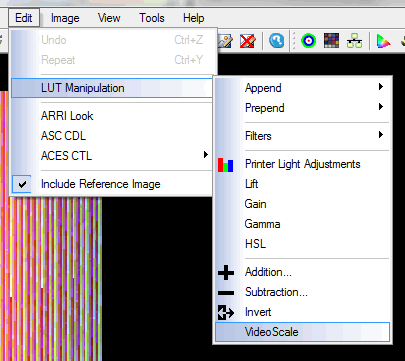
The next step is to export the LUT to our computer by going to File > Export. In the Export dialog box we choose the eeColor65 3D LUT format. The LUT will be saved as a .txt file.
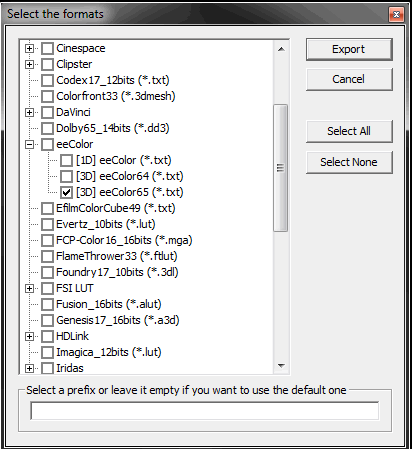
We will be using the TruVue eeColor Application to upload the LUT to the . On a Windows computer, go to C:\Program Files (x86)\Entertainment Experience LLC\TruVue eeColor Application\Data\3dtable\standard nonrgb led\General Media, which is the default installation directory of the application.
You will find 6 existing LUTs named 3DLUT_1.txt, 3DLUT_2.txt, 3DLUT_3.txt, 3DLUT_4.txt, 3DLUT_5.txt, 3DLUT_6.txt. Once you start the upload to the eeColor box the TruVue application will always take these 6 files and upload them to the .
We rename our Lightspace LUT file to any of the 6 file names listed above. A general practice is to keep 3DLUT_6.txt as a unity LUT (meaning it has no calibration offsets, it does not change the signal) so we can later visually compare between a calibration LUT and the original, unaltered signal path by simply switching between the LUTs.
We copy our renamed LUT file into the directory.
Since the upload to the always uploads all 6 LUT files (there is no option to upload just a single file) and it takes a little bit of time, now would be a good time to export other LUTs from Lightspace and upload them as well (as a comparison). For example, we could create and export the original Rec 709 Gamma 2.2 LUT from Lightspace (without any gamma adjustments). We could create and export other color targets such as Rec 709 Gamma 2.25. Rec 709 Gamma 2.30, BT.1886 etc and include them in the upload. Just don't forget to videoscale each of those LUTs !
Advanced eeColor LUT analysis: When comparing various eeColor LUTs created for the same display, the eeColor 3D LUT Analyzer allows us to analyze which eeColor LUT triggers the least amount of processing inside the eeColor box. This is of interest if we are comparing multiple eeColor LUTs (that for example were created with different pre-profile display setups) that all perform similar in delta E reports. In this case (in which all LUTs perform well or similar in delta E reports) we would prefer a LUT that has the least amount of processing / adjustments to the signal. Larger signal adjustments can cause banding and/or color artifacts, and this is usually not picked up by delta E reports. Please note that the eeColor 3D LUT Analyzer compares eeColor LUTs that are not videoscaled, so simply export non-videoscaled LUTs to your computer and then use those in the tool.
We now start the upload to the by opening the Truvue application and going to eeColor Download > Start Download. In the new window, make sure the eeColor 3D Tables option is checked and then under Display Type and eeColor 3D Tables go to Display Type > Standard Non-RGB LED Display > General Media. Make sure to highlight the General Media option. Now click the Download button.
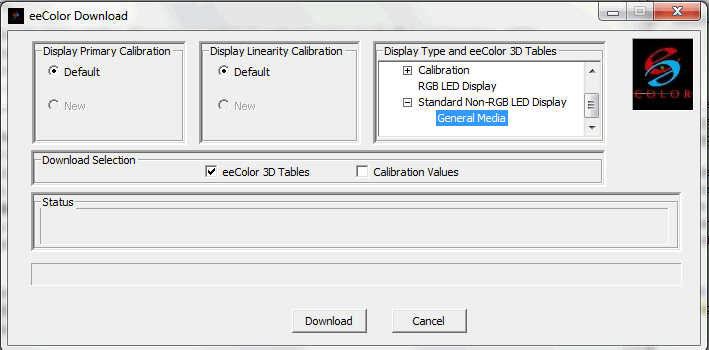
Once the upload is complete (takes usually 4-6 minutes), we make the LUT (created from our last custom color space) active in the .
Validation Patch Set
This validation patch set was created via the Custom Color Patch Sequence Generator and has 1,087 points. The set contain points that were profiled and points that were not profiled so we can validate direct offset compensation points and interpolation points of the LUT.
The validation patch set has 15 degree hue spacing, 10 brightness levels and 8 saturation levels (in groups of 4). Below 20% brightness, the set samples only 3 saturation levels.
Choosing this hue interval means that we are automatically sampling all primary and secondary colors R|G|B|C|M|Y at 0, 60, 120, 180, 240, 300 degrees and all points in-between them and all points in-between the in-between points.
Since we originally profiled every second hue (basically every even hue number) that means that this hue interval has the effect that we validate hues that were not profiled, i.e. 15, 45, 75 degree etc. (so we will see how good the interpolation is in some parts of the gamut) and then on every other hue (which is an even hue number such as 30, 60, 90) we validate hues that were originally profiled (so we can verify how good the LUT is at direct offset compensation).
Again, we arrange the patches to cycle between dark / bright patches to help prevent ABL on the VT60 Plasma.
Here's a screenshot of the parameters used in the Custom Color Patch Sequence Generator:
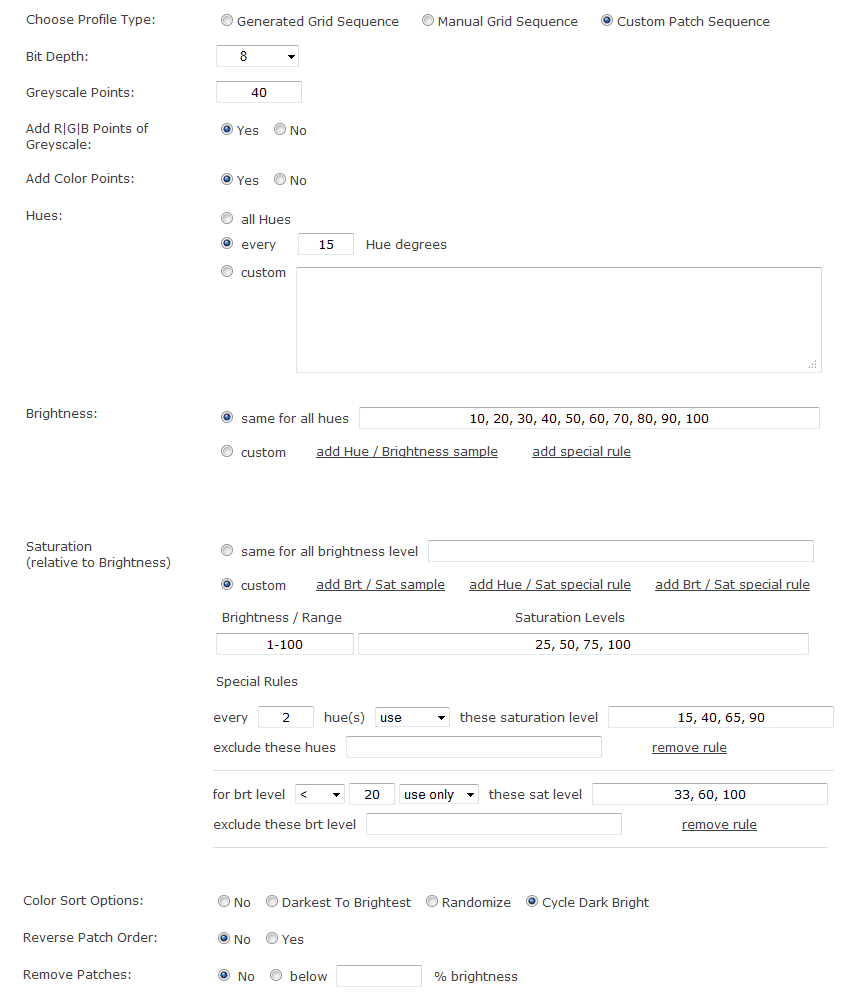
To learn more about how custom patch sets can improve your calibration please read the Advantage Of Custom Color Patch Sets In Display Calibration guide.
Color Validation - 1087 Point Patch Set
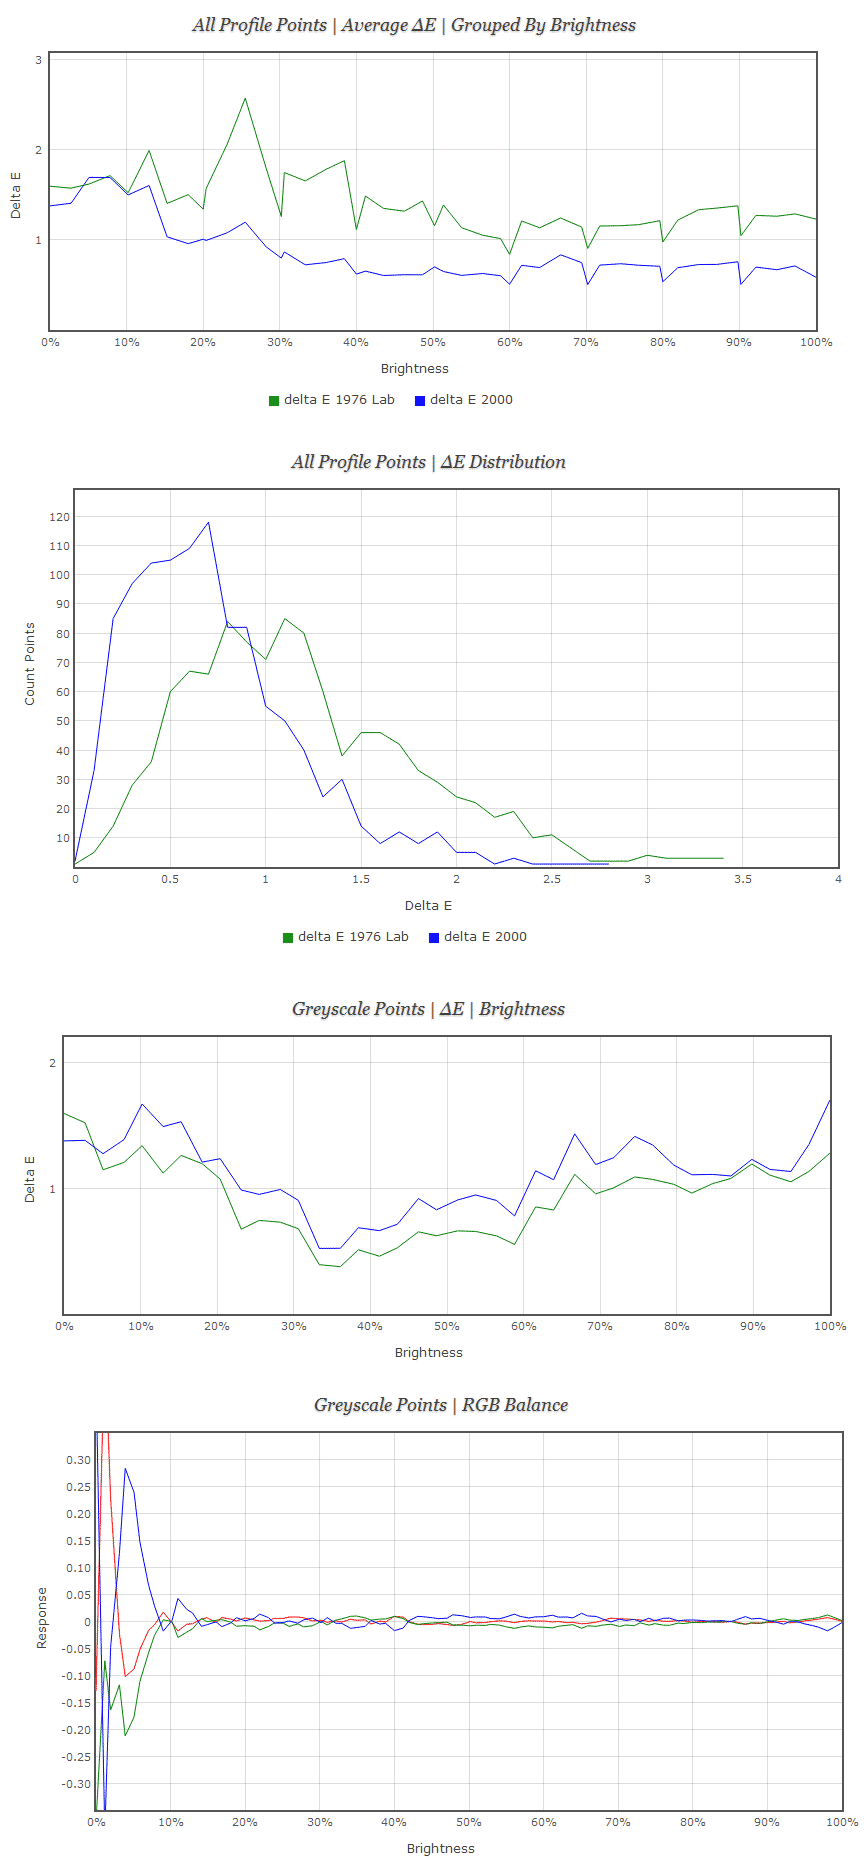
With the LUT (that was created from our last custom color space) active in the eeColor box, we now run a full validation profile using , our custom 1087 point patch set and the K10-A with spectro offset. Here are the main sections (except gamma, which we have validated already) from the report of the Lightspace Profile Reporter tool:
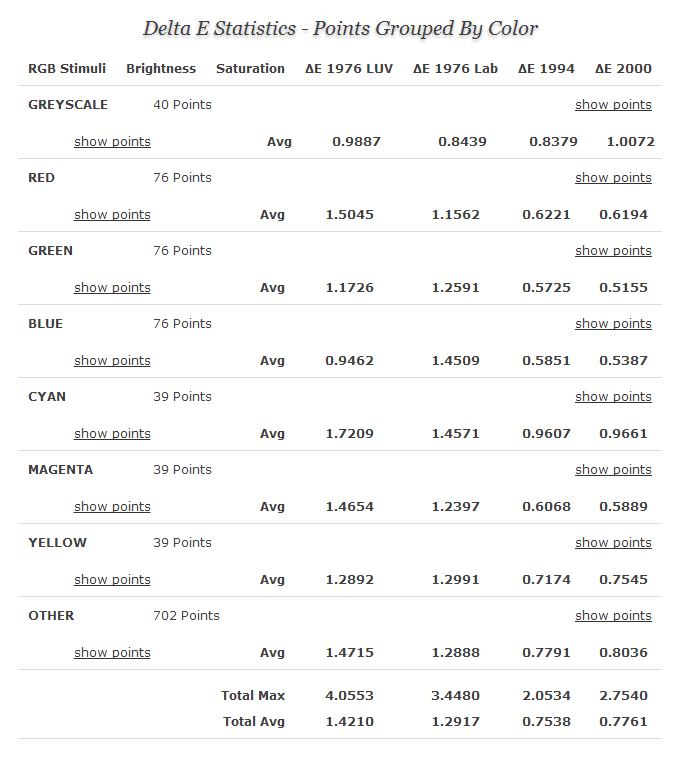
Average Delta E Brightness, Delta E Distribution, Greyscale & RGB Balance:
Color Validation - SG Flesh Tones
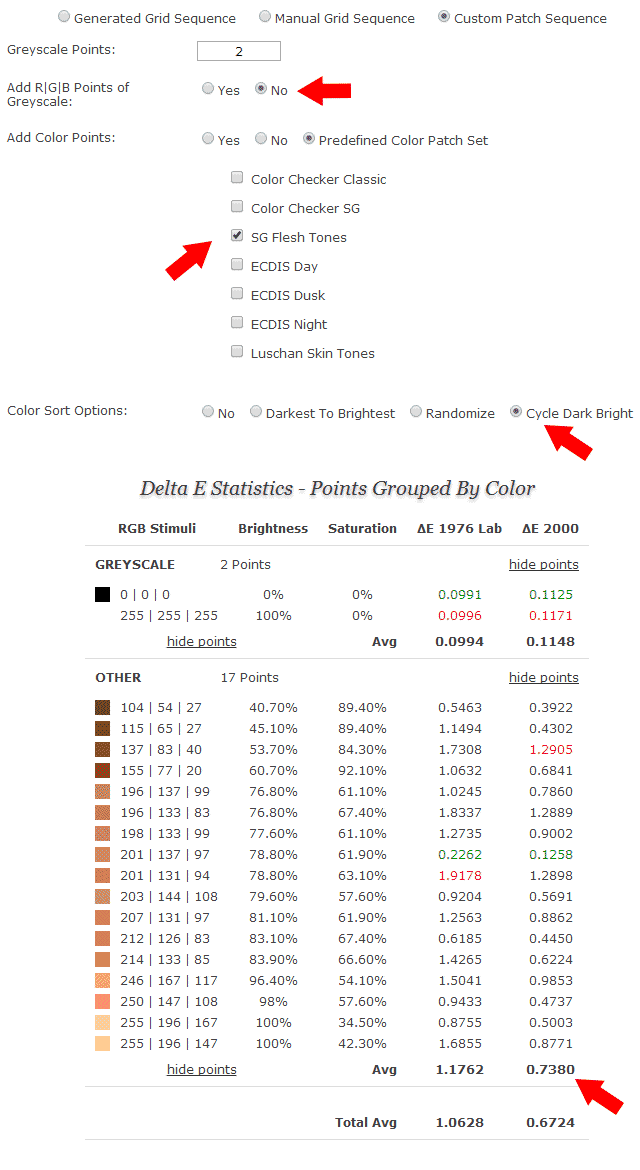
Delta E performance (19 points - 17 points without Greyscale points) validated in the Lightspace Profile Reporter of SG Flesh Tones patch set created via Custom Color Patch Sequence Generator:
Color Validation - Delta E 2000 Filter 2.3
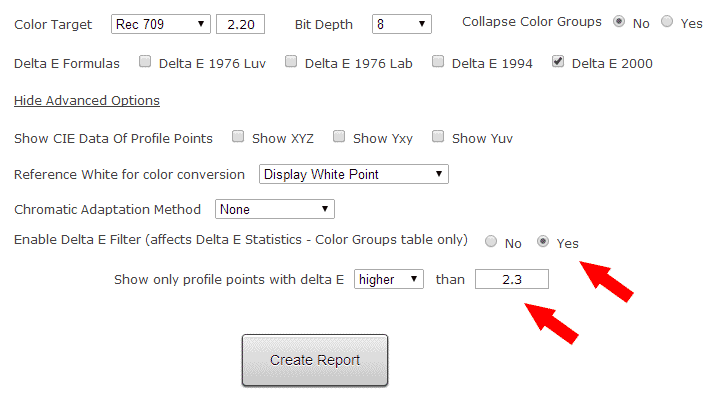
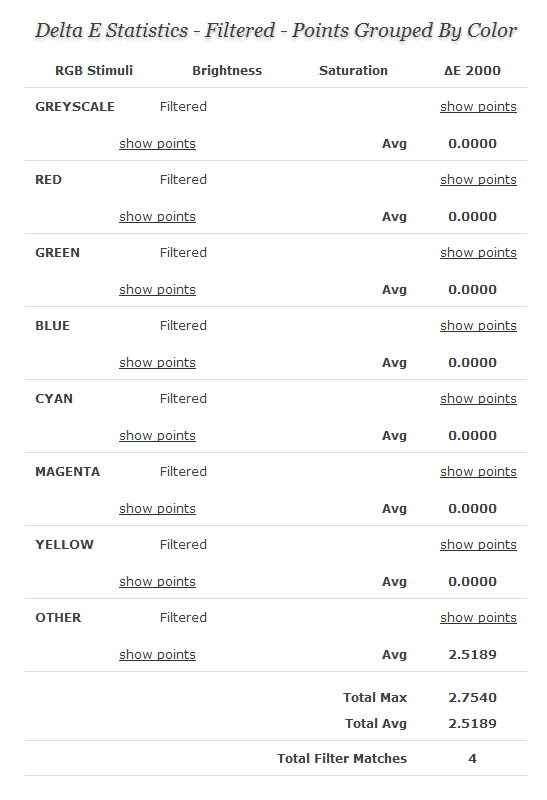
Our final check is to use a delta E 2000 threshold of 2.3 and see how many points are above that.
Here's the Lightspace Profile Reporter setup for our 1087 point validation profile:
The report only shows 4 points (from our 1087 point custom validation patch set) that have a delta E 2000 of higher than 2.3:
Visual validation with reference Blu-ray content confirms what the delta E reports and graphs tell: this is a great calibration and the the picture quality of this Panasonic TC-P65VT60 in combination with an eeColor 65^3 LUT produced by Lightspace is stunning.
Stay informed about our professional calibration solutions, new display calibration guides and workflows, and exclusive promotional offers - register here for free.
For other Display Calibration Guides & Workflows, please click here.